Making homemade sushi is easier than you might think! With just a few fresh ingredients and the right rolling techniques, you can create delicious sushi rolls, nigiri, and hand rolls in your own kitchen. This recipe will guide you through making sushi rice, preparing fillings, and shaping different sushi styles for a fun, restaurant-quality meal at home.
I always thought making sushi would be intimidating. However, once I tried it, I realized it’s actually fun, approachable, and easy to customize with different fillings and toppings.
I love being able to choose my favorite fish, load up on extra avocado, or even make veggie-only rolls when I want a lighter option. Plus, there’s something really satisfying about rolling your own sushi and slicing it into perfect pieces. I’ll walk you through my simple methods to prepare four of the most popular types of sushi: maki, uramaki, nigiri, and hand rolls. By the end, you’ll be slicing fish and rolling nori like a pro!
Ingredients and Notes
See the recipe card below for the complete ingredients list and instructions.
- Sushi Rice – A type of short-grain rice, sushi rice has a higher starch content than other types of white rice, which helps the granules cling together.
- Kombu – A type of Japanese seaweed, this adds delicious umami flavor to the rice.
- Sweetened Rice Vinegar – This is a mixture of rice vinegar, sugar, and salt (steeped with kombu) that gives sushi rice its signature sweet, umami flavor.
- Fish – For this homemade sushi tutorial, I’m using raw tuna, raw salmon, and raw yellowtail. Make sure your fish is sushi-grade, or it won’t be safe to eat.
- Veggies – I like to include cucumber, avocado, and bell pepper for color and texture.
- Nori Sheets – A type of edible seaweed, this wraps the rolls and adds a salty, umami taste while holding all the ingredients together.
How to Make Homemade Sushi Rolls
1. Make the Sushi Rice
2. Prepare the Fillings
3. Assemble Maki or Uramaki (Sushi Rolls or Inside-Out Sushi Rolls)
4. Prepare Nigiri
5. Make a Hand Roll
Possible Variations
One of the best parts about homemade sushi is experimenting with different types of rolls. Once you’ve mastered the basics, try these popular variations:
- California Roll – Use imitation crab, avocado, and cucumber as the filling.
- Philadelphia Roll – This is a creamy roll made with salmon, cream cheese, and cucumber.
- Shrimp Tempura Roll – Layer fried shrimp tempura, cucumber, and avocado over sticky rice, and roll it up with nori.
- Veggie Roll – Use carrots, bell pepper, cucumber, and avocado for a light, colorful option.
- Spicy Tuna Roll – Mix chopped tuna with spicy mayo for a flavorful twist.
Nick’s Tips for Success
- Prevent sticky hands. Keep a small bowl of water nearby to prevent rice from sticking to your hands.
- Create clean slices. Use a sharp knife dipped in water to slice rolls cleanly, and wipe it off after each slice.
- Prevent drying. Cover the finished sushi with a damp paper towel, kitchen towel, or plastic wrap until you’re ready to serve. This prevents the nori from drying out.
- Avoid overfilling. Leave plenty of space around the edges of the nori, or your rolls are likely to break.

Homemade Sushi Recipe
Equipment
- Rice Cooker
- Fine Mesh Sieve
- Hangiri (Or a Large Wooden/Ceramic Bowl)
- Rice Paddle
- Bamboo Sushi Mat
- Sharp Knife
- Cutting Board
- Small Bowl
Ingredients
Sushi Rice
- 2 cup (400-450 gram) sushi rice
- 2½ cup (600 milliliter) water
- 1 (3×3 inch / 8×8 centimeter) piece kombu (rishiri)
Sweetened Rice Vinegar
- 4 tablespoon (60 milliliter) rice vinegar
- 2 tablespoon (25 gram) sugar
- 1 teaspoon (6 gram) kosher salt
- 1 slice kombu
Fillings
- 4 ounce (115 gram) sushi-grade tuna, thinly sliced
- 4 ounce (115 gram) sushi-grade salmon, thinly sliced
- 4 ounce (115 gram) sushi-grade yellowtail , thinly sliced
- ½ cucumber, julienned
- ½ bell pepper, julienned
- 1 avocado, thinly sliced
- 5 nori sheet, cut in half
- lemon or lime wedges, optional, for serving
- sesame seeds, optional, garnish
- scallions, for hand rolls
- wasabi, optional, for serving
Instructions
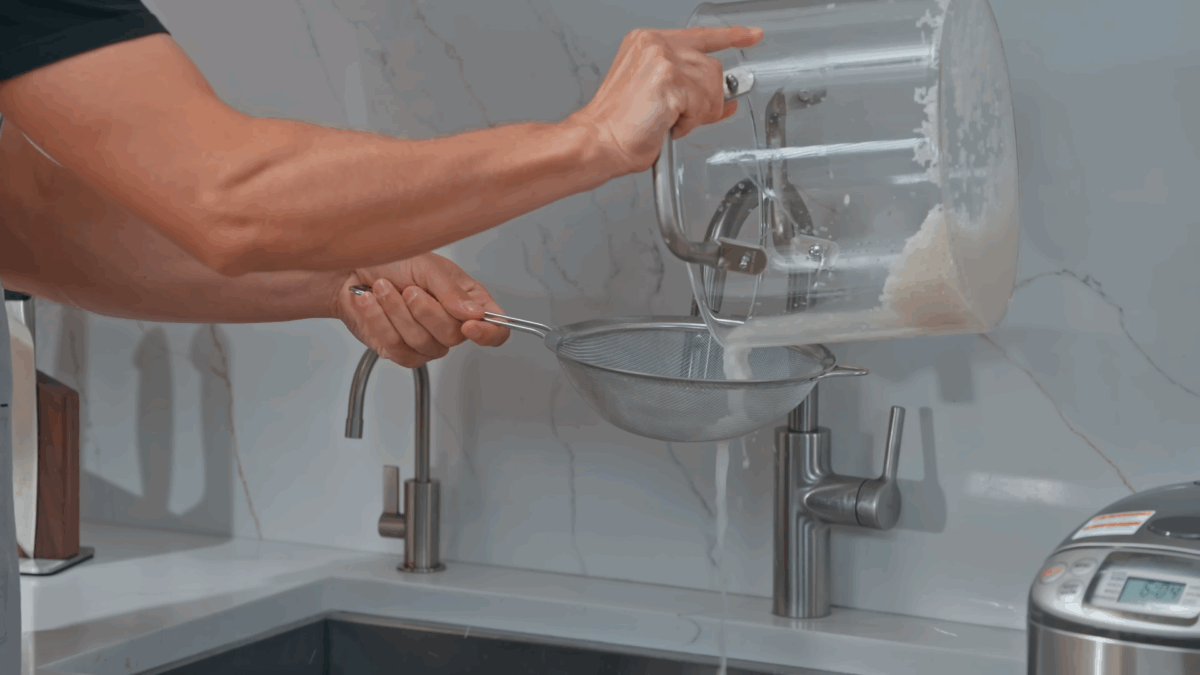
Make the Sushi Rice
- Rinse sushi rice in a fine mesh sieve until water runs clear.
- Place rice, water, and kombu in a rice cooker. Let soak for 20 minutes.
- Cook using the “sushi rice” setting (about 1 hour) or until tender.
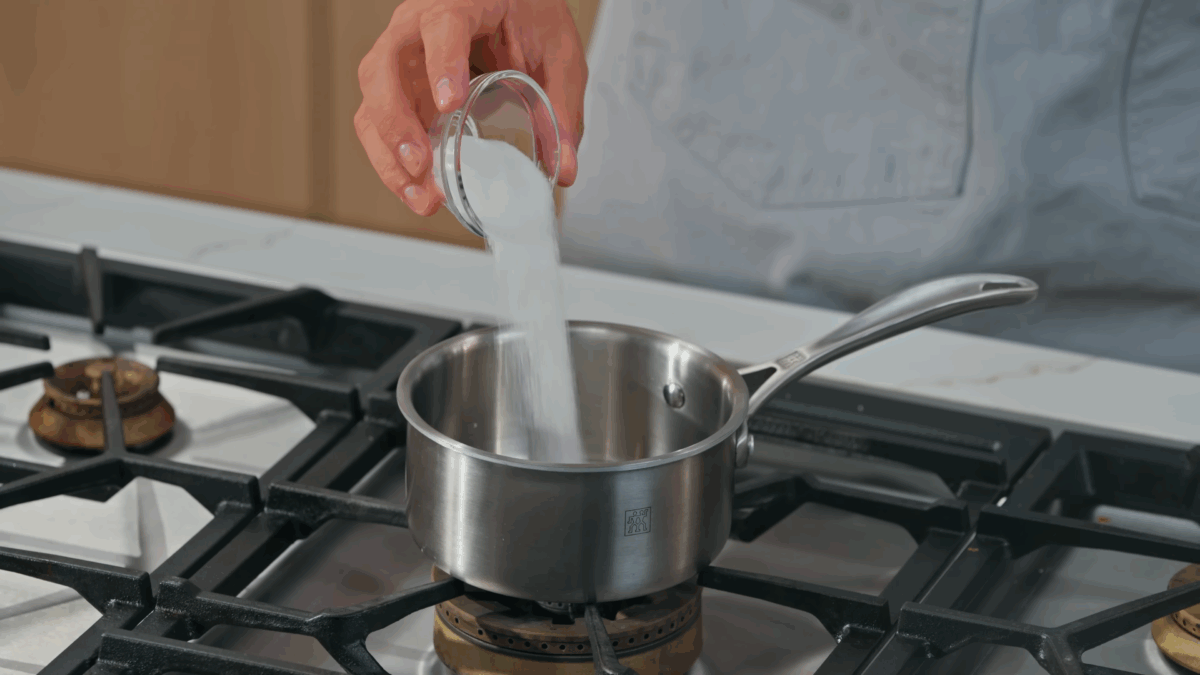
Make the Sweetened Rice Vinegar
- In a small saucepan (or microwave-safe bowl), combine vinegar, sugar, and salt.
- Heat until sugar and salt dissolve.
- Remove from heat, stir, and add kombu. Let cool.
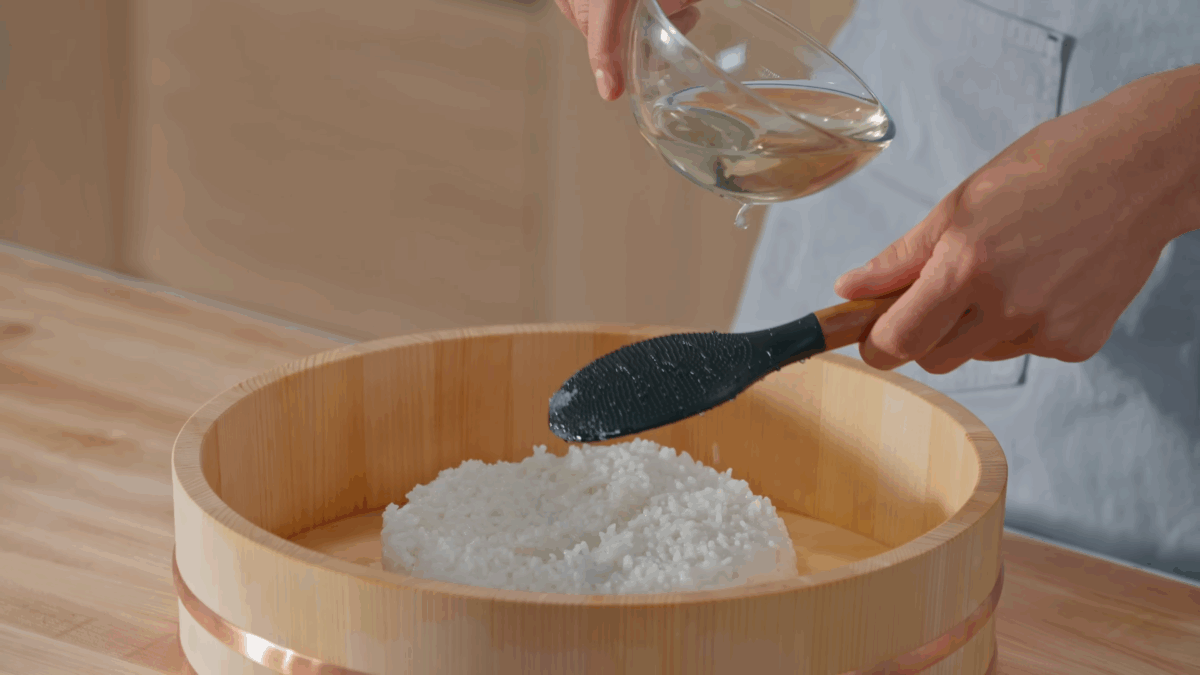
Season the Rice
- Moisten and dry a hangiri (or bowl).
- Discard kombu from cooked rice and transfer rice to the bowl.
- Slice and fold rice gently with a rice paddle at a 45 degree angle while slowly drizzling in the vinegar mixture.
- Fan the rice to cool and create a glossy finish. Keep warm in the rice cooker until use.
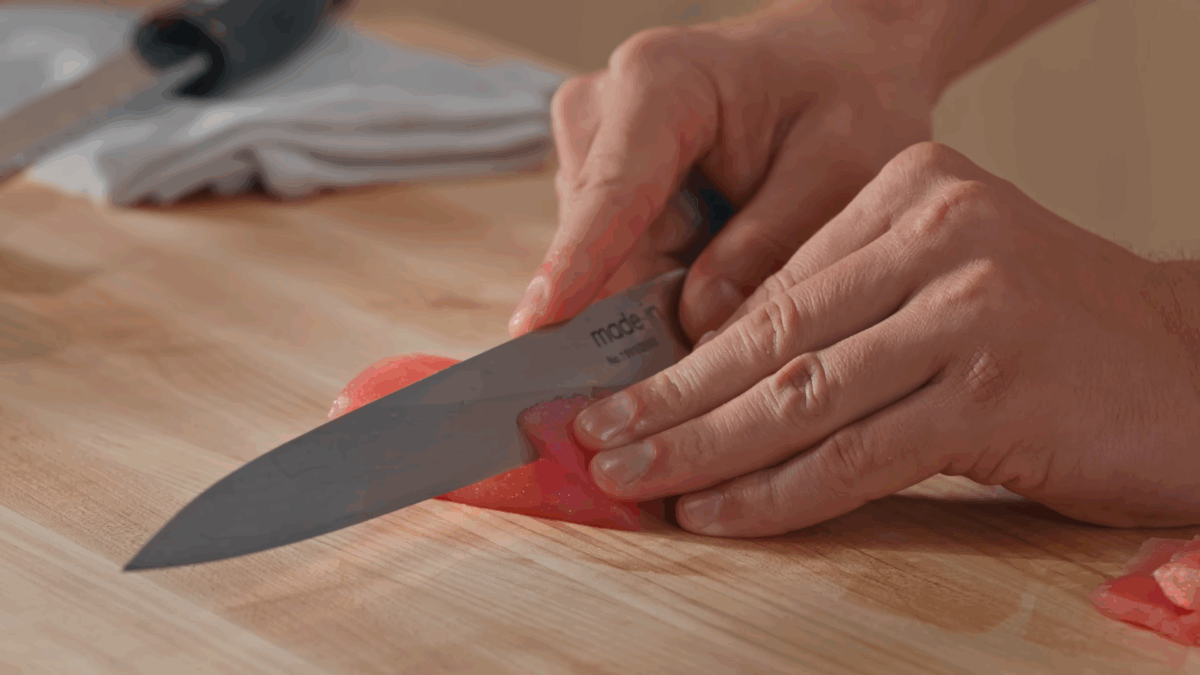
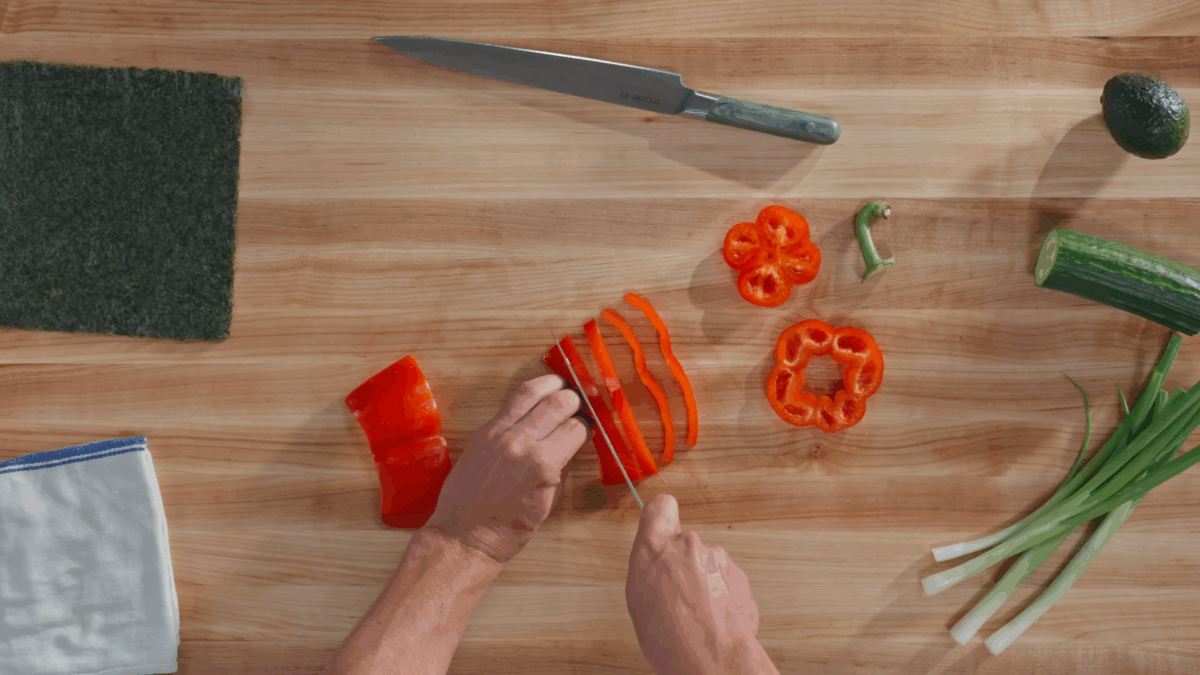
Prepare the Fillings
- Slice tuna, salmon, and yellowtail thinly against the grain.
- Julienne cucumber and bell pepper.
- Slice avocado thinly. Keep pieces uniform for even rolling.
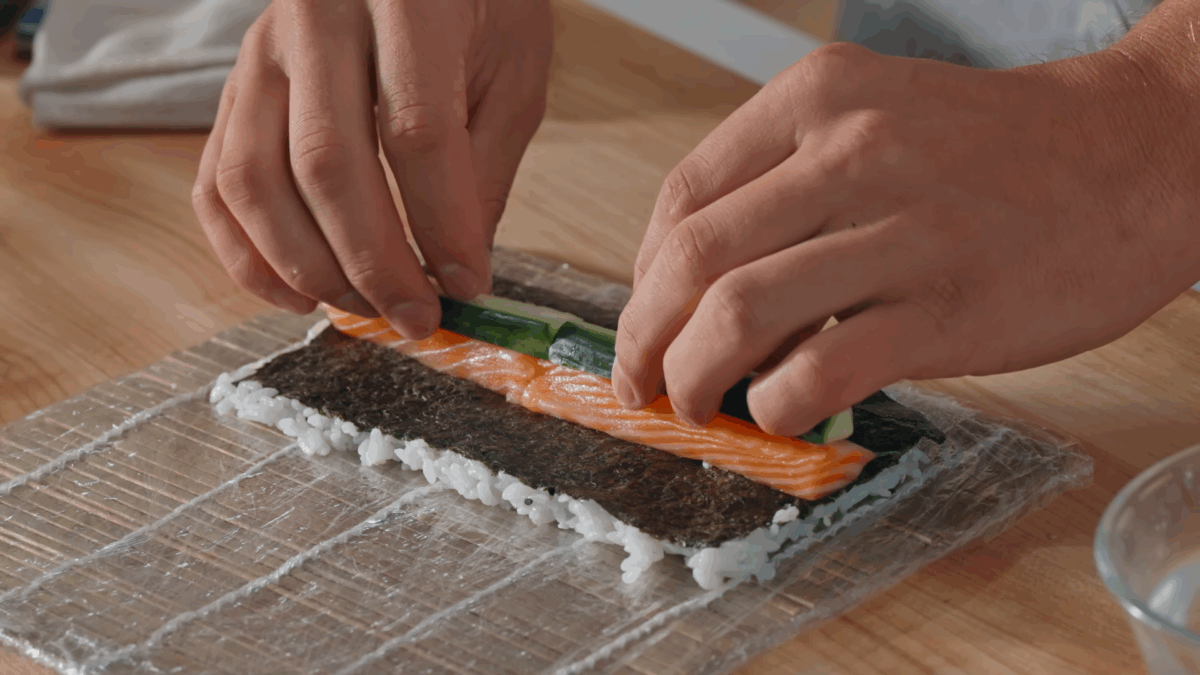
Make Maki Rolls (Sushi Rolls)
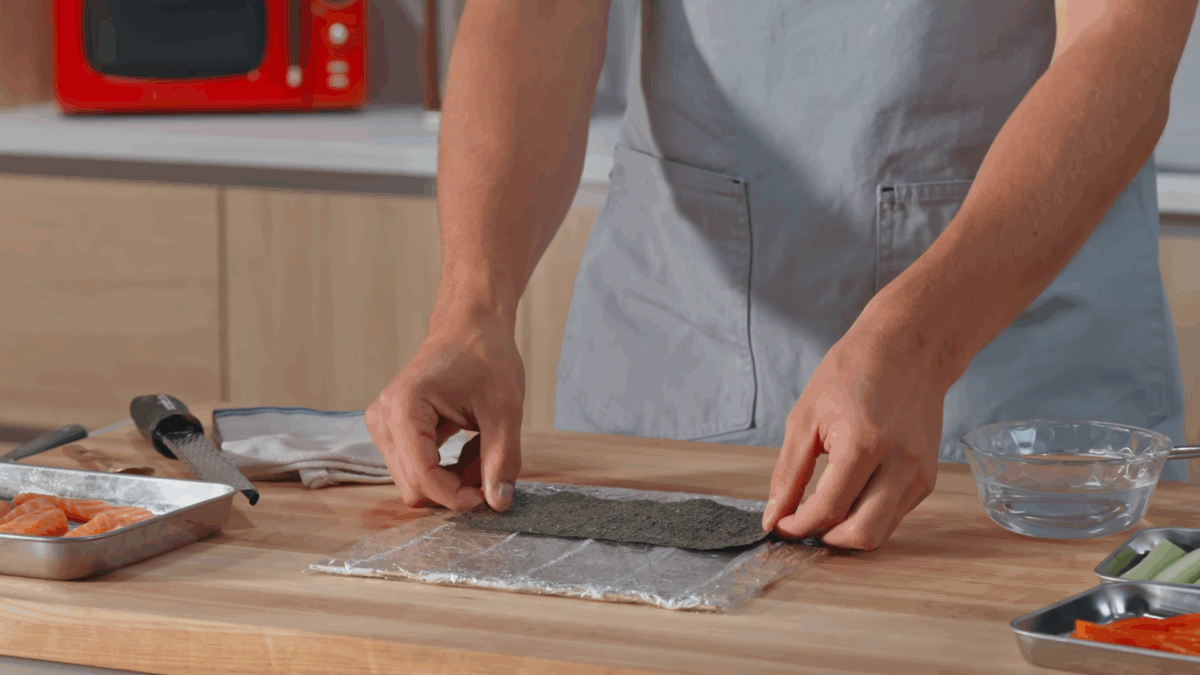
- Place half a sheet of nori on a sushi mat, shiny side down.
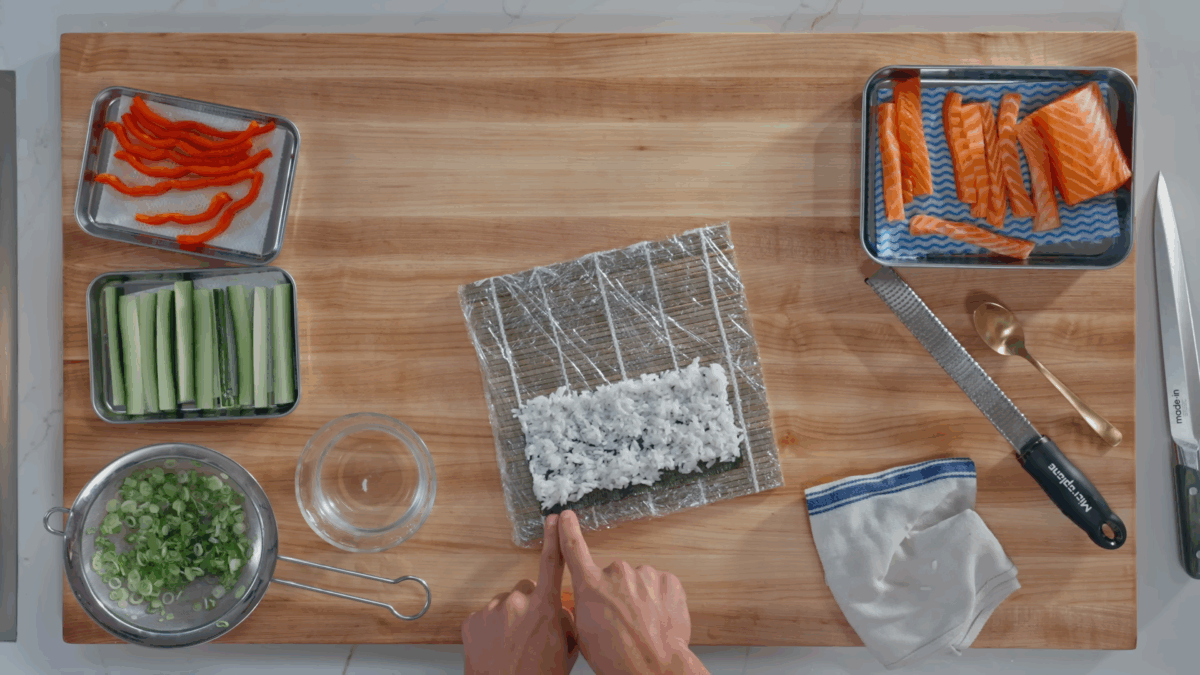
- Moisten hands, scoop ¼ to ½ cup (50–100 gram) rice, and spread evenly, leaving a ¼-inch (0.6 cm) strip at the top uncovered.
- Add one filling (fish or vegetable) horizontally across the center.
- Roll mat over filling tightly, sealing with the uncovered nori edge.
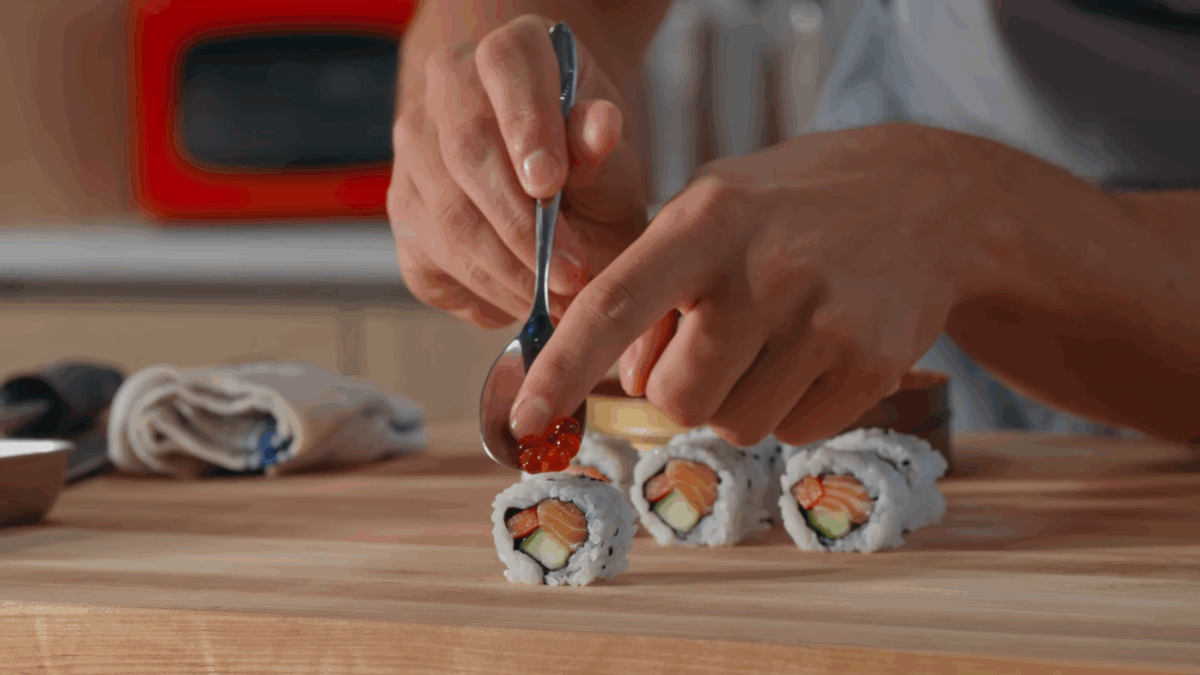
- Slice roll in half, then into even pieces, cleaning knife after each cut.
- Cover completed rolls with a damp towel until serving.
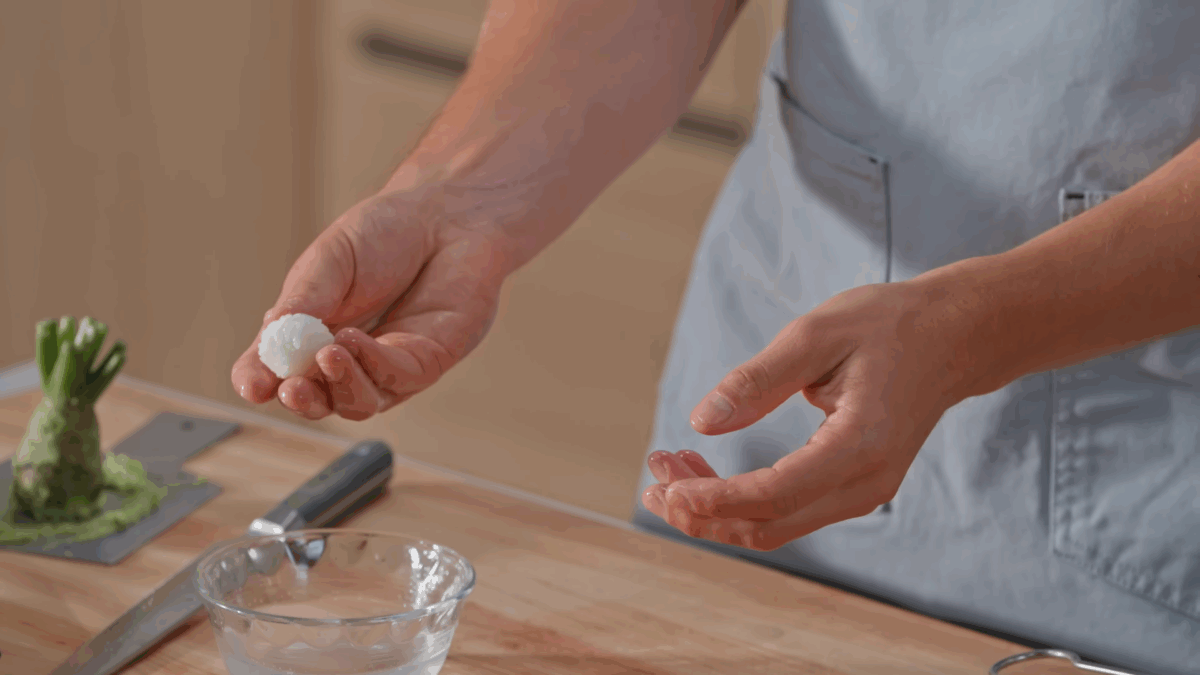
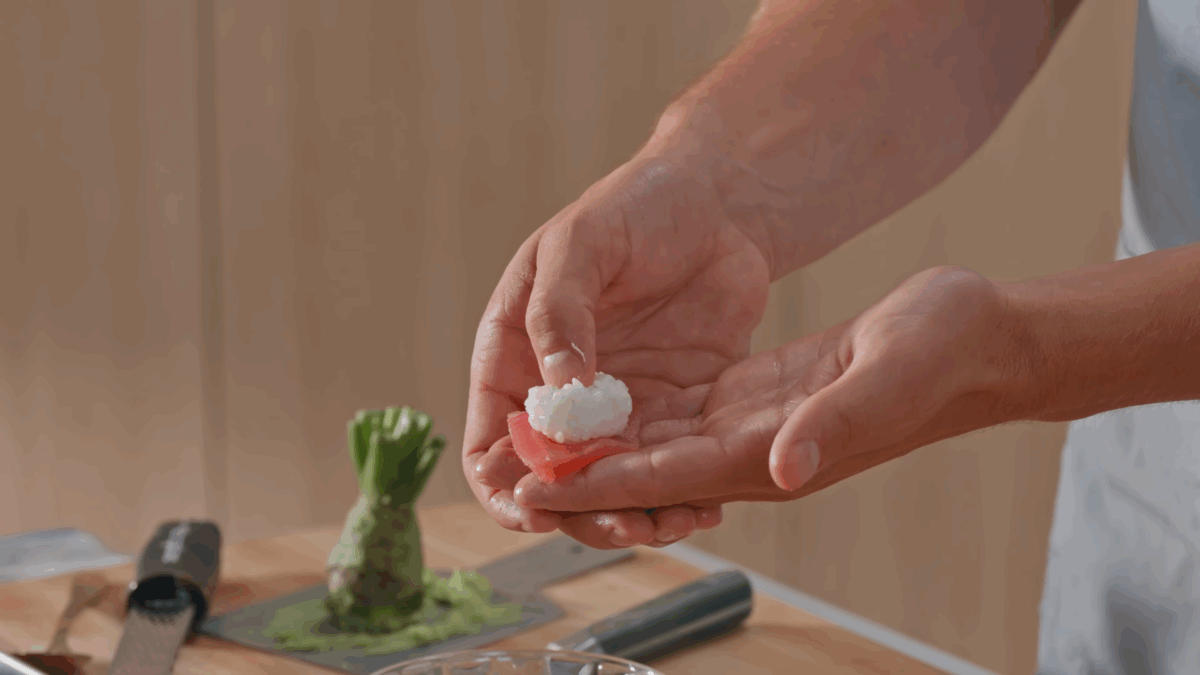
Make Nigiri (Tuna)
- Slice tuna at a diagonal into ¼-inch (0.6 centimeter) thick pieces (~½ ounce / 15 gram each).
- Moisten dominant hand with water, scoop a cherry-sized ball of rice.
- Dab a small amount of wasabi onto the fish.
- Place rice on fish, flip, and gently shape into an oval, pressing sides and top.
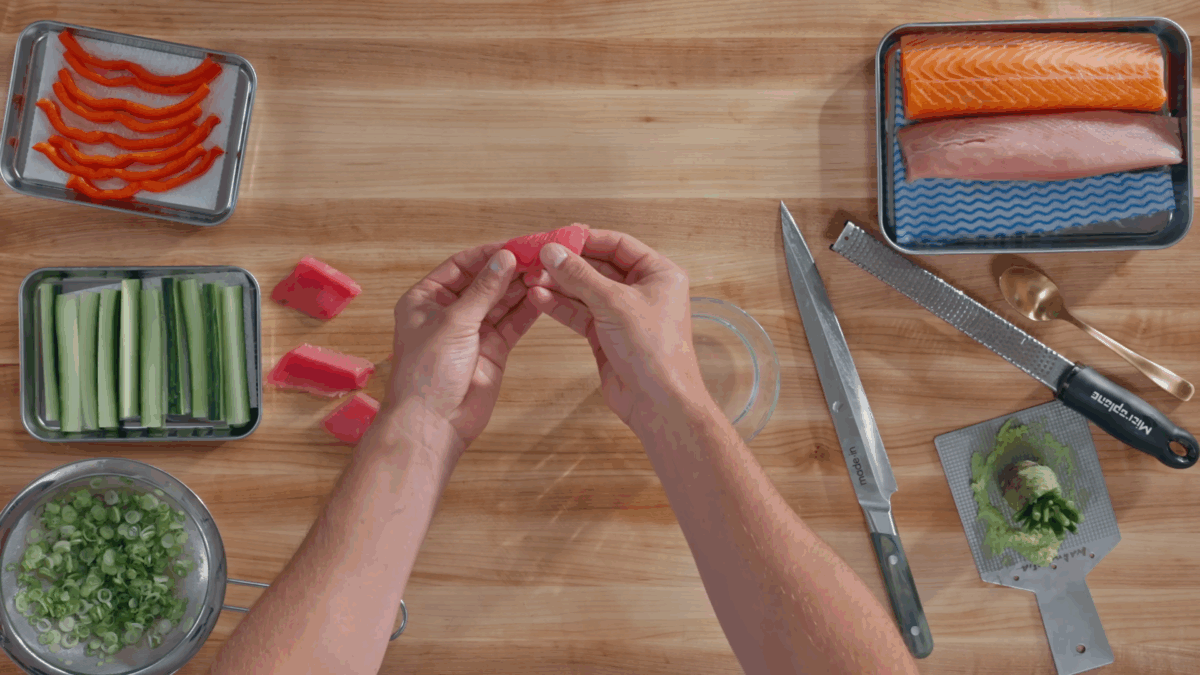
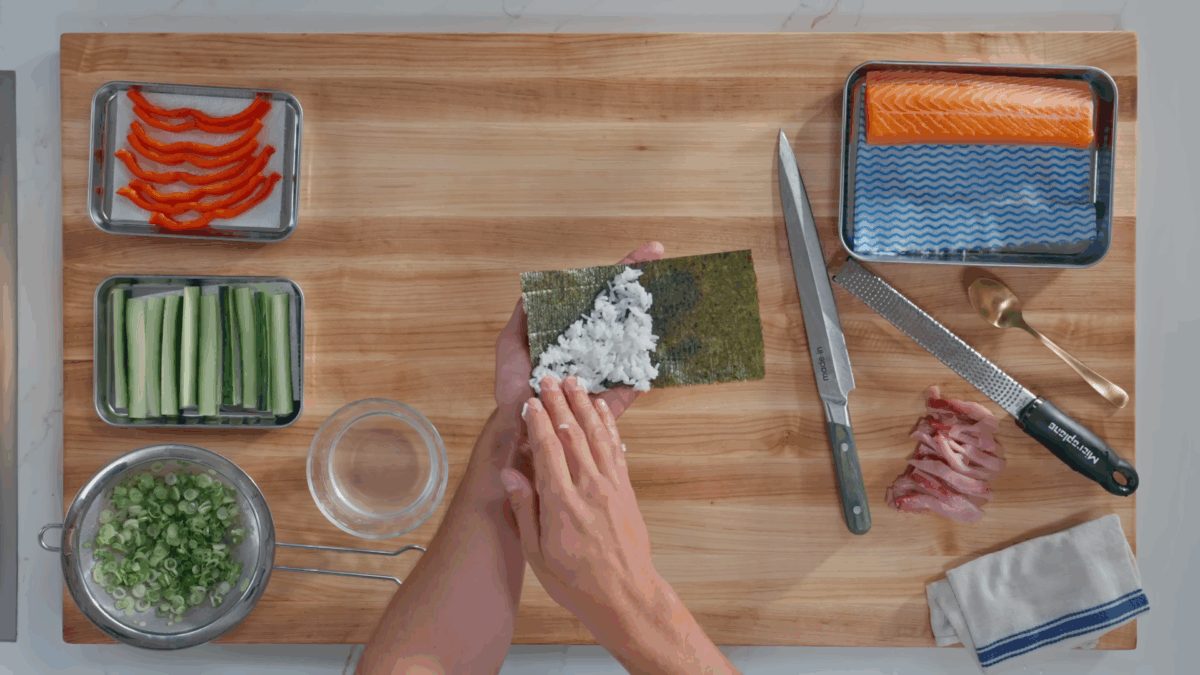
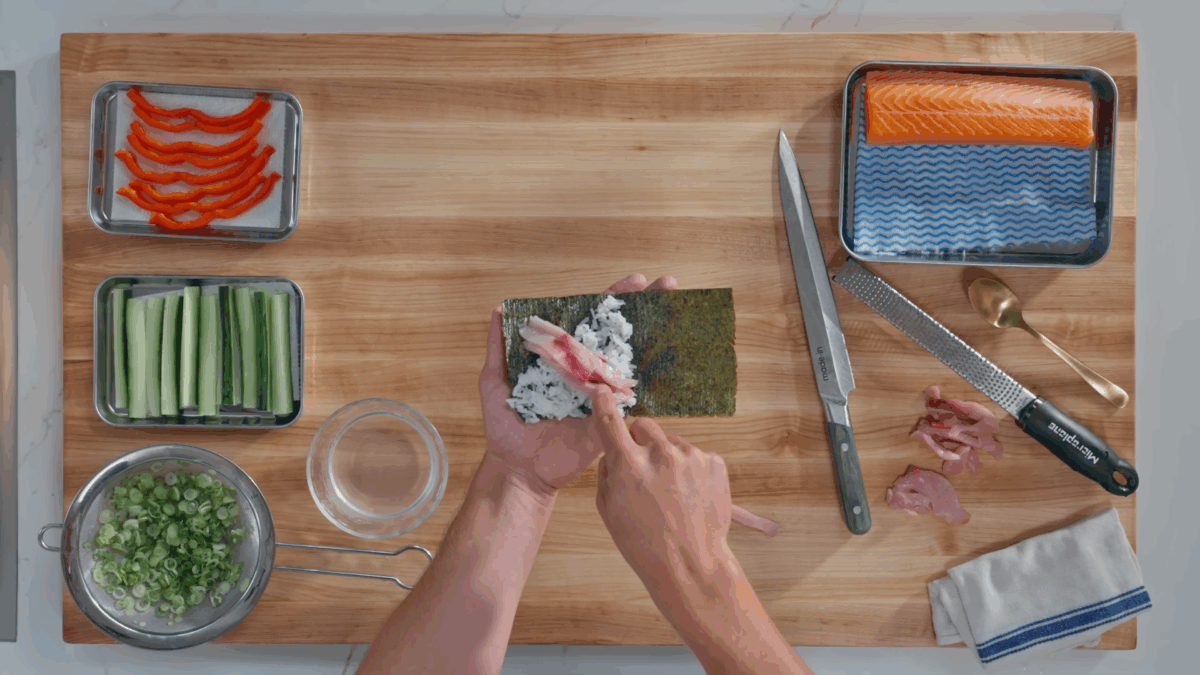
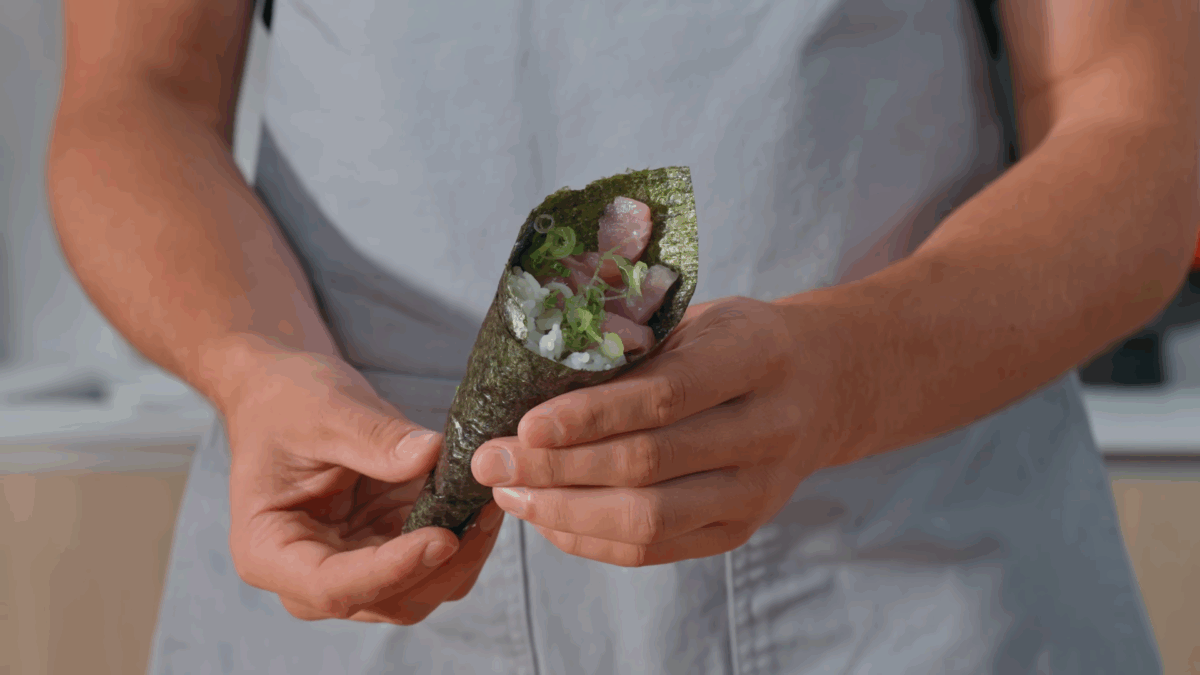
Make a Hand Roll (Temaki – Yellowtail)
- Slice yellowtail into thin 0.4-inch (one centimeter) strips.
- Cut nori sheet in half and hold in your hand.
- Spread rice in a triangle from center to one corner.
- Place yellowtail and scallions diagonally opposite the rice.
- Roll from the rice corner toward fish to form a cone shape.
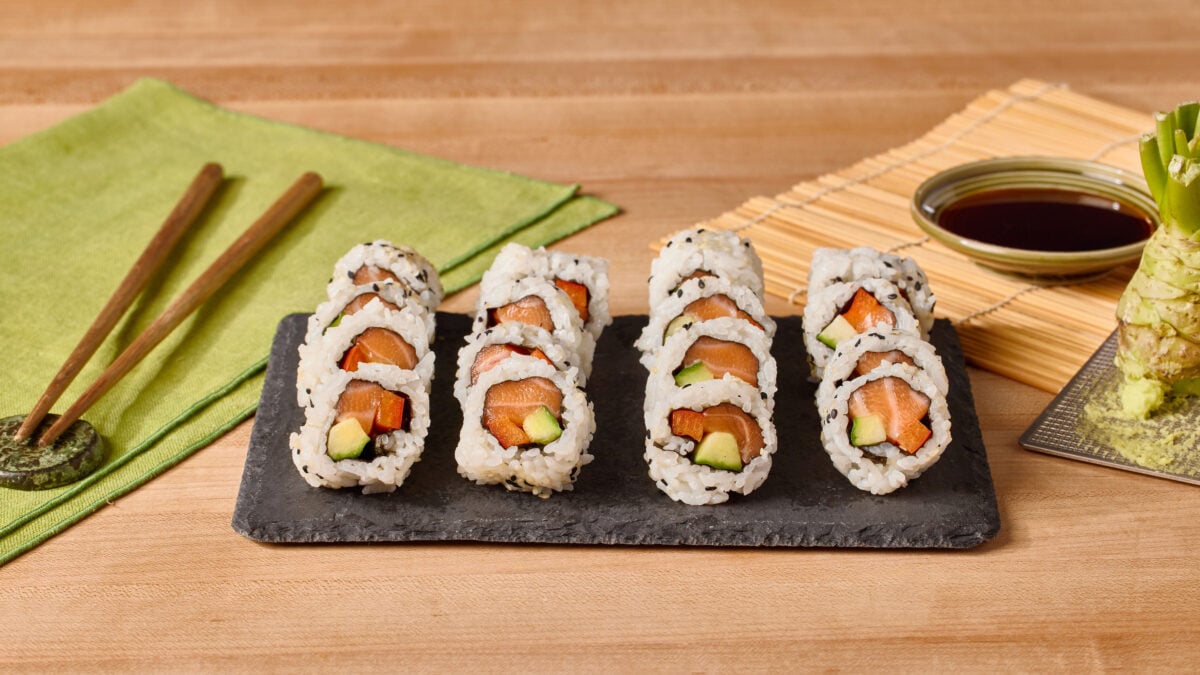
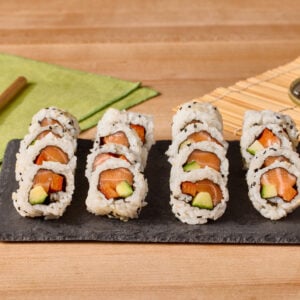
Make an Inside-Out Roll (Uramaki – Salmon)
- Spread rice evenly on nori, then flip so rice faces down.
- Add salmon and avocado across center.
- Roll tightly with mat, shaping firmly.
- Optionally sprinkle sesame seeds or top with thin fish slices before cutting.
Video

Notes
- Keep a small bowl of water nearby to prevent sticky hands and help cut clean slices.
- Don’t overfill the sushi rolls, or they’ll break.
- Cover finished sushi with a damp towel until ready to serve.
Nutrition
Nutrition information is automatically calculated, so should only be used as an approximation.
 Like this recipe? Rate & comment below!
FAQs
A bamboo sushi mat makes rolling easier, but you can use parchment paper or a clean kitchen towel if needed.
Yes. Just be sure to buy sushi-grade fish from a trusted source, or stick with cooked proteins and vegetables.
Cooked shrimp, imitation crab sticks, smoked salmon, tofu, or just veggies all make great filling options.

This is the best shushi I’ve had, easy, homemade and flavorful. I will put other reviews today or tomorrow for everything I tried this shushi is relly flavorful sticky rice worked out
This is the best shushi I’ve had, easy, homemade and flavorful. I will put other reviews today or tomorrow for everything I tried
amazing
So easy and I could even do it with my kids🍣
This is amazing!
I wish that i could visit you!
This is so fun to make at home!